
Mocha WOL Setup Wizard
Wake-on-LAN (WOL) allows a computer to be turned on or woken up by a network message.
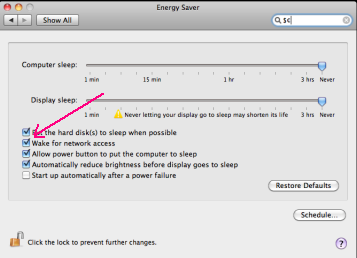
Enable a Mac OS X computer to be woken up
In the 'System Preferences', select 'Energy Saver' , and check the 'Wake for network access'
Enable a Windows 7 computer to be woken up
- - Open Network and Sharing Center (click the Start button, type Network and Sharing in the Start Search box, and press Enter).
- - Click the Change adapter settings link in the upper left of the navigation pane.
- - Right click the network connection you want to enable/disable power management support on and click Properties.
- - Click Configure.
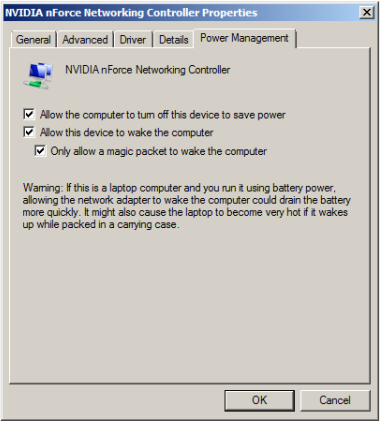
- - On the Power Management tab, check or clear the Allow the computer to turn off this device to save power check box.
When checked, power management is enabled on the network adapter.- - Enable all 3 options as shown below.
Enable a Windows XP computer to be woken up
- - Start - Settings - Control Panel - System
- - Hardware tab, device manager
- - From the list of hardware devices, click on network adapters, and the network adapter for the Ethernet card (not WIFI)
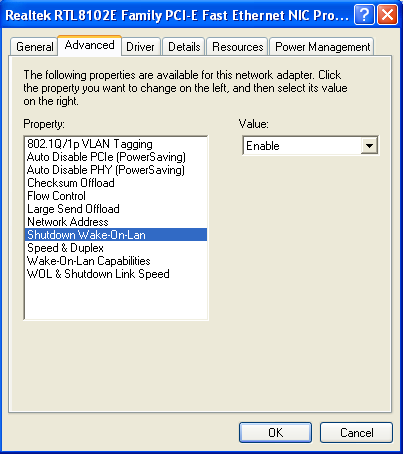
- - Select advanced tab
- - Select Wake from shutdown to on
- - Select Wake on LAN capabilities to Magic Packet
Waking computer from the Internet
For a HOME network, the easiest way, is in the router to forward (NAT) an UPD port as 9 to the broadcast address xxx.xxx.xxx.255.
If the router does not allow NAT to be forwarded on a broadcast address (it is a bug in some routers), a work around is to define the subnet for your LAN as 255.255.255.128 , and forward the UDP port 9 to IP 192.168.2.127, which is the broadcast address for your new subnet (if your network is using range 192.168.2.xxx).
On some routers, first define subnet as 255.255.255.0, and NAT UDP port 9 to 192.168.2.127 (if your network is using range 192.168.2.xxx), save the configuration, and hereafter change the subnet to 255.255.255.128.
Another solution to above problem, but more risky, is to use the IP address last used for the PC/Mac. The router may remember which cable interface, which last used the MAC address, and will send the WOL package to the correct Ethernet cable, but if the router is booted, such an information will be lost, and WOL will fail.
In Mocha WOL, as IP address, write the IP address for the router. This IP address can be found, with a browser and http://canyousee.org . Make sure to select WOL on LAN off.
Configure Mocha WOL
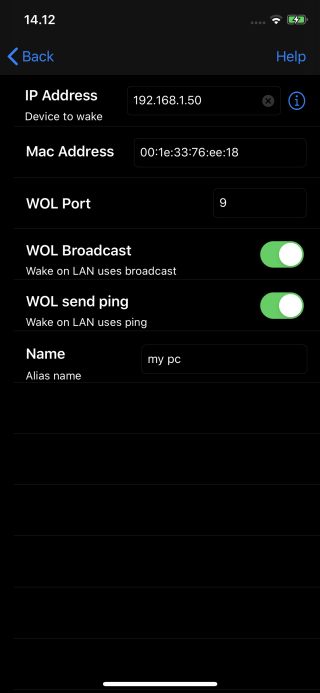
- IP Address: Only needed if using WOL from the Internet or phone network. In such a case it should be the IP address for the router, seen from the Internet. Unless you're paying extra for a static public IP, your ISP can change your public IP address whenever it wants, often when you reboot your router. A solution is to use a service as http://no-ip.com
Service http://canyousee.org , will tell you the IP address for the router.- MAC Address: The syntax is 12 hex digits. Separators as : and - are legal. Example: 00:0a:96:ac:02:35
See section below for how to find the address.- WOL Port: The port used for the WOL UDP package. On a HOME network, it is not important. Use 9
- Name: An alias name for the configuration
- WOL send Ping: If on a LAN, it is possible to check if the PC/Mac has been booted, using ping. If the iPhone/iPad is only on the Internet, it will not be useful, as ping will be send to the router and maybe the router will answer, but it tells nothing about the state for the PC or Mac, we are trying to wake.
- WOL broadcast: If using WOL on a local network, use broadcast, as you cannot be sure the router remember where the device with the given MAC address is connected. On the Internet (phone on 3g/4g network), never use broadcast.
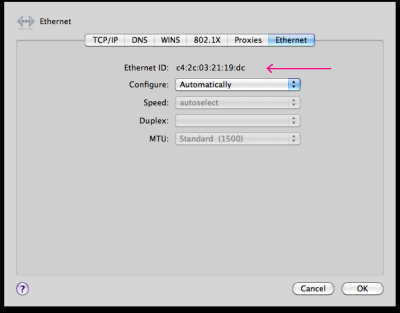
Finding the MAC address for a MAC OS X computer
In the 'System Preferences', select 'Network' , and the Ethernet (not WIFI) - 'Advanced' - Ethernet
Finding the MAC address for a Windows PC
- 1. Start the command line tool by entering cmd.exe into the search field in the start menu .
- 2. Type getmac and press enter
- 3. For more interface details use command ipconfig -all.
Copyright (c) 1997-2024 MochaSoft Aps. All Rights Reserved. |